Monday, June 6, 2011
Maybe blogging isn't really for me?
It looks like an interesting concept but perhaps not for me. I thought, "Why not create a blog to share some of my crafty blunders and the solutions that worked best for me?" One post. It's sad. I guess I'm not meant to share words of wisdom with the outside world and the solutions to my problems will not help other crafters after all.
Tuesday, May 3, 2011
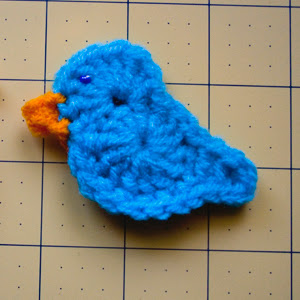
Little bluebird crochet pattern
I thought I would start out my blog with a little crochet pattern. I've been seeing these cute little crocheted bluebirds and I decided I wanted some. I looked at a few of them and came up with this pattern - which I will share with you!
The pattern is fairly simple but since it's the first one I've ever written I'm sure it will be full of errors. I apologize in advance.
Abbreviations used:
sc- single crochet
dc- double crochet
sl st - slip stitch
Supplies: small amounts of worsted weight yarn for body and beak; small black bead or button for eye; a crochet hook size G (4.25); needle and thread for sewing on eye; and a yarn needle for finishing.
1st round:
Begin with a magic circle (there is a good tutorial for that here)
Chain 2 then work 13 dc into magic circle,
join with sl st to top of chain 2,
chain 4, turn and work sc into 2nd chain from hook, then work hdc in next chain and dc in last chain,
2nd round:
skip one dc in circle and sl st in next four around,
in the fifth dc work hdc, 8 dc, hdc,
sl st in rest of dc around circle to the end of the tail.
To give the bird a nice finished edge cut the yarn at the last sl st about 2 inches long and pull the cut edge through the stitch you just made. Take the yarn and thread a yarn needle - insert the needle from the front to the back of the next chain then back into the middle of your last stitch and through the back of the chain only. (If I feel brave enough I will try to take some photos and make a little tutorial on how to do this next.)
For the nose:
Join orange (or color of choice to the chain above the bend in the birds neck and chain 3, sl st in 2nd chain from hook, sc in next chain, sl st to next chain on bird (at bend in neck). Fasten off.
Hide threads.
Sew small bead or button for eye.
I attached a piece of magnetic tape on the back so I can stick my bird on the fridge.
I hope this is helpful (not confusing) and that someone out there will enjoy making little birds as much as I did!
I have found so much inspiration in the blogs and photos that everyone shares. I love figuring out how to make things for myself. I want to share the solutions I find and the mistakes I make along the way. I plan to make more patterns and tutorials available if all goes well. . .
Thanks to anyone who happens upon this first blog posting.
 |
| Little Blue Bird |
Abbreviations used:
sc- single crochet
dc- double crochet
sl st - slip stitch
Supplies: small amounts of worsted weight yarn for body and beak; small black bead or button for eye; a crochet hook size G (4.25); needle and thread for sewing on eye; and a yarn needle for finishing.
1st round:
Begin with a magic circle (there is a good tutorial for that here)
Chain 2 then work 13 dc into magic circle,
join with sl st to top of chain 2,
chain 4, turn and work sc into 2nd chain from hook, then work hdc in next chain and dc in last chain,
2nd round:
skip one dc in circle and sl st in next four around,
in the fifth dc work hdc, 8 dc, hdc,
sl st in rest of dc around circle to the end of the tail.
To give the bird a nice finished edge cut the yarn at the last sl st about 2 inches long and pull the cut edge through the stitch you just made. Take the yarn and thread a yarn needle - insert the needle from the front to the back of the next chain then back into the middle of your last stitch and through the back of the chain only. (If I feel brave enough I will try to take some photos and make a little tutorial on how to do this next.)
For the nose:
Join orange (or color of choice to the chain above the bend in the birds neck and chain 3, sl st in 2nd chain from hook, sc in next chain, sl st to next chain on bird (at bend in neck). Fasten off.
Hide threads.
Sew small bead or button for eye.
I attached a piece of magnetic tape on the back so I can stick my bird on the fridge.
I hope this is helpful (not confusing) and that someone out there will enjoy making little birds as much as I did!
I have found so much inspiration in the blogs and photos that everyone shares. I love figuring out how to make things for myself. I want to share the solutions I find and the mistakes I make along the way. I plan to make more patterns and tutorials available if all goes well. . .
Thanks to anyone who happens upon this first blog posting.
Subscribe to:
Comments (Atom)
